ubuntu 相关的工具/命令 合集
汇总ubuntu上使用的一些相关工具/命令
ubuntu录制视频转换
ubuntu自带的录制工具输出格式为webm, windows上播放会有卡顿等问题.
ffmpeg的转换命令
1
2
3
4
5
# 固定帧率 (30fps)
ffmpeg.exe -i D:/input.webm -r 30 -c:v libx264 -preset slow -crf 22 -c:a aac -b:a 128k output.mp4

# 保持原帧率
ffmpeg.exe -i D:/input.webm -c:v libx264 -preset slow -crf 22 -vsync 2 -c:a aac -b:a 128k output.mp4
Server相关
github密钥相关
无法连接
首先需要排除代理的问题
网页可以登录github http.proxy和https.proxy已经按照系统代理的端口进行了设置 但是在终端 
测试连接

测试443端口
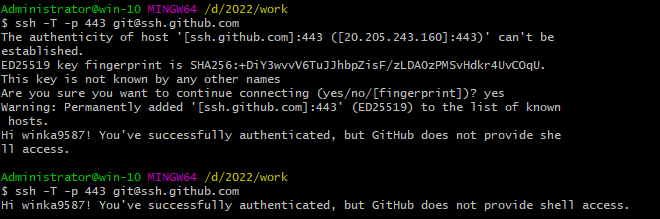
如果是第一次连接是上面的情况,输入yes之后再连接是下面
说明443端口没问题,但是22端口有问题
找到git目录,修改xxx/Git/etc/ssh/ssh_config 在最底下加上 注意加上密钥的位置 Host github.com User git Hostname ssh.github.com PreferredAuthentications publickey IdentityFile C:/Users/Administrator/.ssh/id_rsa Port 443
设置完保存。重启终端测试

ssh密钥的生成
https://blog.csdn.net/Serena_tz/article/details/115109206
或者最简单的:
生成密钥
1
2
3
4
5
ubuntu
https://help.ubuntu.com/community/SSH/OpenSSH/Keys
win
https://learn.microsoft.com/zh-cn/windows-server/administration/openssh/openssh_keymanagement
ssh-keygen -t rsa -b 2048 -f /path/remote-ssh-auth
-f 是指定保存路径和名字, 如果仅有一个名字的话是会在当前路径下生成

生成了一个公钥(.pub)一个私钥
可以通过-f 指定路径例如
1
ssh-keygen -t rsa -b 2048 -f D:/dddxxx/xx/keyname
一般来说,windows默认生成的密钥在目录下 C:\Users{username}.ssh
如果找不到可以使用 ssh-keygen 看看保存到了哪里
Mac遇到的问题
1
ssh -T git@github.com
显示
1
git@github.com: Permission denied (publickey).
解决方案:
是因为在生成密钥的时候,并非使用默认的密钥名字,而是使用-f 参数手动设置的 需要在本地手动添加
1
ssh-add ~/.ssh/{自定义名字}
如果报错
Could not open a connection to your authentication agent.
运行 ssh-agent
1
eval "$(ssh-agent -s)"
成功, 输出如下:
1
2
ssh -T git@github.com
Hi winka9587! You've successfully authenticated, but GitHub does not provide shell access.
同一个账户不同目录使用不同github密钥
一台机器多人使用:
使用git config自带的includeIf https://wiki.eryajf.net/pages/6ec567/#%E7%9B%B8%E5%90%8C%E6%89%98%E7%AE%A1%E7%AB%99
首先解除原本的global设置,如果PC仅一个人使用,使用全局设置无可厚非。但现在情况不同,如果没有接触,会自动使用默认的全局配置。
包含两部分 1.git config –global user.name user.email 使用unset解除 2.~/.ssh/下的密钥,删除github-setting中对应的即可 如果只做了操作1,那么当一个用户随便设置一个global的user.name和user.email即可使用该密钥,以该密钥绑定的github用户的身份进行操作。
git添加huggingface密钥
https://huggingface.co/docs/hub/en/security-git-ssh#generating-a-new-ssh-keypair
在这之后,如果要访问hf,还需要access token(好像直接进行这一步可以跳过上面的ssh密钥部分,下次测试) https://huggingface.co/docs/huggingface_hub/en/guides/cli#huggingface-cli-login 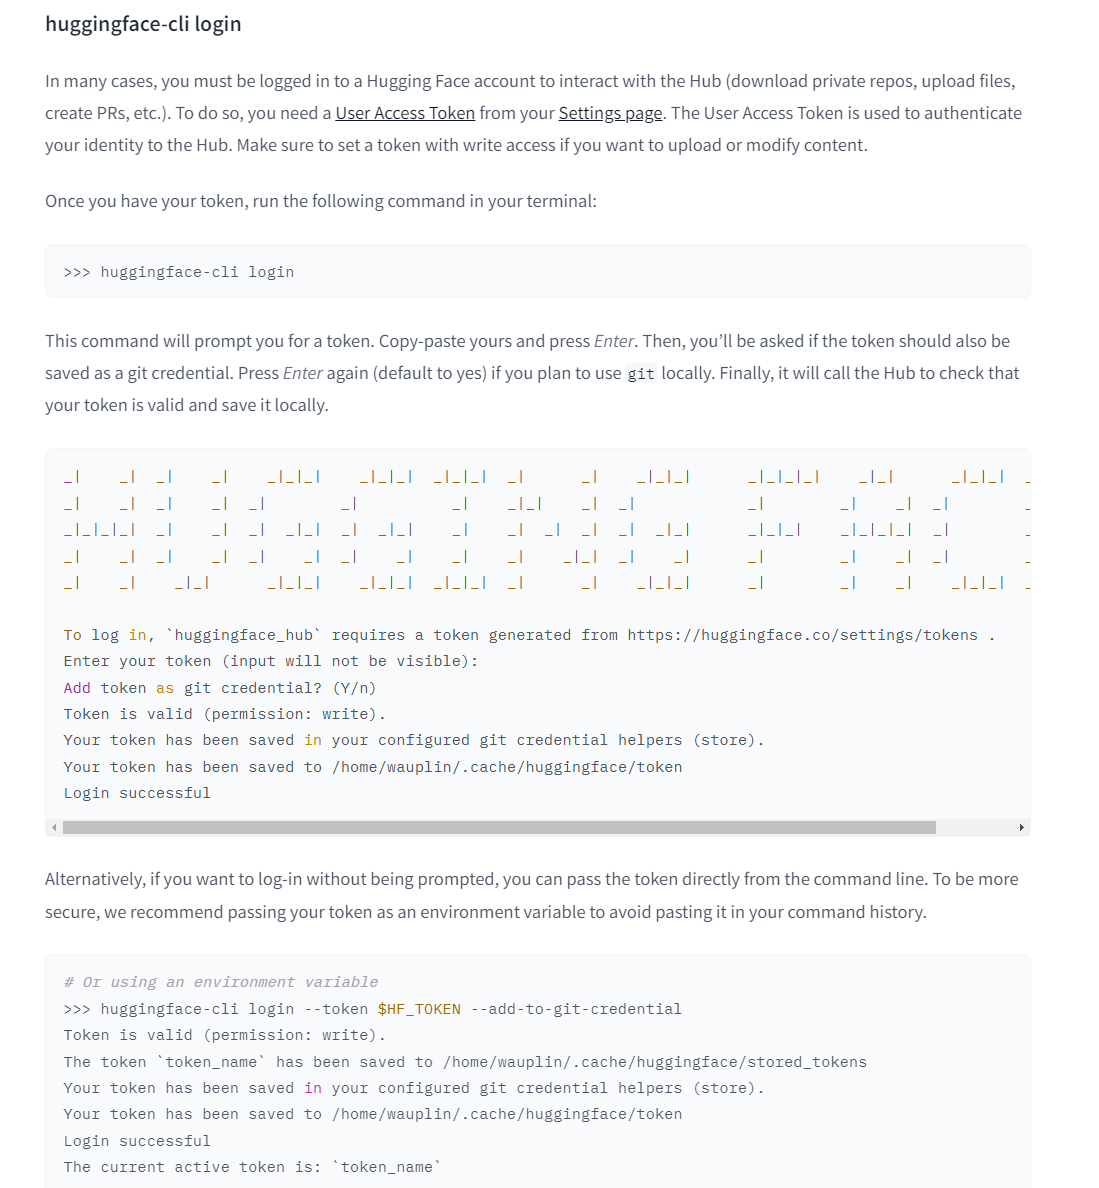
Max retries exceeded with url …  输入token后一段时间超时,挂梯子解决。
hf cli安装
1
2
pip install -U huggingface_hub
hf version
1
huggingface-cli login
创建token时记得授权。
同样的解决方案:
1
 Smudge error: Error downloading libero_10_no_noops/1.0.0/liber_o10-train.tfrecord-00000-of-00032 (40e014ad56148f3268fc19299f311265a16373186f22304293304a0911331af3): batch response: Authentication required: Password authentication in git is no longer supported. You must use a user access token or an SSH key instead. See https://huggingface.co/blog/password-git-deprecation
批量传输文件
相比于scp, 支持检查跳过已经完成的文件
1
rsync -avz --ignore-existing -e ssh user@remote:/path/to/source/ /path/to/destination/
-a:归档模式(保留权限、时间戳等)。 -v:显示详细输出。 -z:压缩传输。
gsutil安装
1
2
3
4
5
6
sudo apt update
sudo apt install snapd
sudo snap install google-cloud-cli --classic

cho 'export PATH=$PATH:/snap/bin' >> ~/.bashrc
source ~/.bashrc
docker相关
docker代理
docker启动后, 使用export设置和修改代理无法覆盖守护进程的代理,即http-proxy.conf中的优先级更高且不受影响。
1
2
3
4
5
# 首次安装docker没有则创建
# sudo mkdir -p /etc/systemd/system/docker.service.d

# 编辑现有代理
sudo nano /etc/systemd/system/docker.service.d/http-proxy.conf
按以下设置代理
1
2
3
4
[Service]
Environment="HTTP_PROXY=192.168.12.251:<port>"
Environment="HTTPS_PROXY=192.168.12.251:<port>"
Environment="NO_PROXY=localhost,127.0.0.1,::1"
推荐使用:
1
2
3
4
5
6
'cat >/etc/systemd/system/docker.service.d/http-proxy.conf <<EOF
[Service]
Environment="HTTP_PROXY=http://127.0.0.1:7897"
Environment="HTTPS_PROXY=http://127.0.0.1:7897"
Environment="NO_PROXY=localhost,127.0.0.1,::1"
EOF'
重启docker
1
2
sudo systemctl daemon-reload
sudo systemctl restart docker
检查
1
sudo systemctl show docker --property=Environment
问题
1
2
3
4
5
6
7
8
9
10
11
12
13
14
15
16
17
18
19
20
21
22
23
24
25
26
27
28
$ docker compose -f scripts/docker/H200.yml up --build
[+] Building 86.7s (4/4) FINISHED
 => [internal] load local bake definitions                                                                                                                                                                              0.0s
 => => reading from stdin 567B                                                                                                                                                                                          0.0s
 => [internal] load build definition from serve_policy_H200.Dockerfile                                                                                                                                                  0.0s
 => => transferring dockerfile: 2.15kB                                                                                                                                                                                  0.0s
 => [internal] load metadata for ghcr.io/astral-sh/uv:0.5.1                                                                                                                                                             0.0s
 => ERROR [internal] load metadata for docker.io/nvidia/cuda:12.4.1-cudnn-runtime-ubuntu22.04@sha256:2fcc4280646484290cc50dce5e65f388dd04352b07cbe89a635703bd1f9aedb6                                                  86.6s
------
 > [internal] load metadata for docker.io/nvidia/cuda:12.4.1-cudnn-runtime-ubuntu22.04@sha256:2fcc4280646484290cc50dce5e65f388dd04352b07cbe89a635703bd1f9aedb6:
------
serve_policy_H200.Dockerfile:12

--------------------

  10 |     # FROM nvidia/cuda:12.2.2-cudnn8-runtime-ubuntu22.04@sha256:2d913b09e6be8387e1a10976933642c73c840c0b735f0bf3c28d97fc9bc422e0

  11 |     # serach from https://hub.docker.com/r/nvidia/cuda/tags

  12 | >>> FROM nvidia/cuda:12.4.1-cudnn-runtime-ubuntu22.04@sha256:2fcc4280646484290cc50dce5e65f388dd04352b07cbe89a635703bd1f9aedb6

  13 |     COPY --from=ghcr.io/astral-sh/uv:0.5.1 /uv /uvx /bin/

  14 |

--------------------

failed to solve: nvidia/cuda:12.4.1-cudnn-runtime-ubuntu22.04@sha256:2fcc4280646484290cc50dce5e65f388dd04352b07cbe89a635703bd1f9aedb6: failed to resolve source metadata for docker.io/nvidia/cuda:12.4.1-cudnn-runtime-ubuntu22.04@sha256:2fcc4280646484290cc50dce5e65f388dd04352b07cbe89a635703bd1f9aedb6: unexpected status from HEAD request to https://1764161021507418.mirror.aliyuncs.com/v2/nvidia/cuda/manifests/sha256:2fcc4280646484290cc50dce5e65f388dd04352b07cbe89a635703bd1f9aedb6?ns=docker.io: 403 Forbidden
1
2
3
4
5
6
7
8
9
10
11
12
13
14
15
16
17
18
19
20
$ docker pull nvidia/cuda:12.4.1-cudnn-runtime-ubuntu22.04
12.4.1-cudnn-runtime-ubuntu22.04: Pulling from nvidia/cuda
Get "https://registry-1.docker.io/v2/nvidia/cuda/manifests/sha256:0bb88834d973ca1b450fcc2a05333c6fe45510bee289912a5391274c351c4a4d": EOF
$ # 备份
sudo cp -a /etc/docker/daemon.json /etc/docker/daemon.json.bak.$(date +%s) 2>/dev/null || true

用公开镜像源
sudo tee /etc/docker/daemon.json >/dev/null <<'EOF'
{
  "registry-mirrors": [
    "https://docker.m.daocloud.io",
    "https://dockerpull.com",
    "https://hub-mirror.c.163.com"
  ]
}
EOF

应用并重启
sudo systemctl daemon-reload
sudo systemctl restart docker